Wednesday, June 8, 2011

Database adapter polling settings

Database rows per xml is the maximum number of payloads per BPEL instance. For ex: If it is set as ‘1’ then for every record there will be a BPEL instance. If it is set as ‘5’ then for every 5 record there will be one BPEL instance
Database rows per transaction sets the number of records polled per transaction.
Order by will choose order the records in ascending order.The best practice is to choose <No Ordering>, as message ordering regardless is not guaranteed without extra configuration.
Delay commit This will delay the deletion of all rows until all have been read.
Distributed Polling will be used during the clustered environments. This will avoid the creation of multiple instances of BPEL. Means it will avoid the possibility of picking the same record multiple times in a clustered environment.
Use batch destroy Use this to delete all rows at once after they have been read.
Scenario: Select the records one by one ordered by some field from the source database in a clustered environment

In the Interaction Options, specify the interaction options, as follows:

GetActiveUnitOfWork, setting that forces all invoke activities in the same global transaction to use the same SQL connection if going to the same database. This makes it easier to guarantee that later invoke activities can see the changes of earlier invoke activities, but you may not need to set this at all (if using emulated two-phase commit, it should automatically be the same connection). Another difference is that for MERGE and INSERT, all changes are not written until the global transaction commits, so this setting also changes the timing of when WRITE operations occur.

Detect Omissions allows the MERGE and INSERT operations to ignore empty or missing XML elements in the input payload. For a MERGE operation, this will prevent valid but unspecified values from being overwritten with NULL. For INSERT operations, they will be omitted from the INSERT statement, allowing default values to take effect.

Optimize Merge should always be set to true, as it is a general enhancement to MERGE performance (using an in query for the primary key existence check

Thursday, December 30, 2010

Oracle SOA Suite - BPEL to JMS

Sharing my quick notes on steps to create and test a JMS Project. Thought it might be useful for someone who is starting on Oracle SOA Product, part of Fusion Middle-ware. We will create a synchronous bpel process that exposes soap endpoint and then writes (invoke) the input message to a queue in the middle of business process and echoes the input message back the client using reply activity.
We will use Oracle JDeveloper and Weblogic server for the runtime. Before we create the process in jdeveloper, we will first configure the JMS Queue in Weblogic server. Here are the steps.

1. Create JMS Queue and ConnectionFactory 

  1. Start Weblogic server and log on to the console (http://localhost:7001/console/) 
  2. In the Domain Structure tree on left, expand Service then click ‘JMS Modules’ (Figure 1) 
  3. Click SOAJMSModule (for development purposes, you can also create a new Module also) and then click ‘New’ button. 
  4. On the opened page, select ‘Queue’ radio button and click ‘Next’ 
  5. Specify queue name (say queueout) and JNDI Name (say, jms/queuein) and click ‘Next’ 
  6. Optional – for Sub-deployment, select ‘SOA Subdeployment’ and target keep the default. Click ‘Finish’ (Figure 2) 
  7. Follow above steps and create Connection Factory (select Connection Factory for step d and specify jndi name, say jms/jmstest-cf)

2. Create Connection Pool 

  1. Click ‘Deployments’ from the Domain Structure and then click JmsAdapter (Figure 3) 
  2. Select ‘Configuration’ tab and ‘Outbound’ sub-tab and then click ‘New’ (Figure 4) 
  3. Select existing ‘oracle.tip.adapter.jms.IJmsConnectionFactory’ radio button and click ‘Next’ (Figure 5) 
  4. Specify JNDI Name, say jmstest/jmstest-cp and click ‘Finish’. 
  5. Expand ‘oracle.tip.adapter.jms.IJmsConnectionFactory’ to verify and configure the newly created connection pool. 
  6. Click the Property Value column for ConnectionFactoryLocation row and enter the connection factory value. Press enter to accept the value. Click ‘Save’ to save the value. (Figure 6)

3. Create JDev Project 

  1. Open JDev and create a SOA Project. Select ‘Composite with BPEL Process’ Option. 
  2. For BPEL Process, select Synchronous Project. 
  3. Double click the composite and drag and drop JMS Adapter to the right swim lane (External Reference) 
  4. Configure the JMS Wizard – enter name, select Oracle Weblogic JMS, specify app server connection, specify operation type (Produce Message, in our case), browse the queue and specify the connection factory jndi. (Figure 7) 
  5. For the Step 8 of JMS Adapter Configration wizard, click the browse button to point to the xsd for the schema for the message to the queue (Figure 8).
  6. Upon completion of wizard, you will see JMS Outbound reference on composite. Also, JCA configuration file (_jms.jca) will with adapter configuration will be created.
  7. Connection the BPEL Process to the outbound reference created in above step. (Figure 9).
  8. Go to BPEL Process and drop assign, invoke and another assign activity between receive and reply activity. Double click invoke and browse partnerlink and pick the outbound_jms partnerlink. Create new variable for the invoke activity. Configure the first assign to copy the input to invoke variable. Also configure the second assign to copy the input to output variable.
  9. Build and deploy the application

4. Testing the Application 

  1. Open the Enterprise Manager (http://localhost:7001/em) 
  2. Expand SOA Node from left tree and click the deployed project. On the main page click ‘Tab’  
  3. Enter input message and click ‘Test Web Service’ (Figure 10). Click respose tab to verify the response. 
  4. To view the message to the queue, go back to the weblogic console ((http://localhost:7001/console/). Navigate to Services -> Messaging -> JMS Modules -> SOAJMSModule -> queueout. Click on Monitoring tab and select the queue and press ‘Show Messages’.

                                                       Figure 1

                                                                Figure 2

 
                                                                     Figure 3


                                                                   Figure 4
                                          

                                                                             Figure 5

                                                            Figure 6


                                                                        Figure 7
          
                                                              Figure 8

                                                     Figure 9


Wednesday, December 29, 2010

XSD validation and exception handling in OSB

In OSB ( Oracle Service Bus , aqualogic service bus ) it is relative easy to add schema validation to your proxy service and to make a custom exception handling for this validation. Just follow the next steps. First in this example I use these xml schema's for the request and response operation.
The request xsd

<?xml version="1.0" encoding="UTF-8"?>
<xs:schema xmlns="http://whitehorses.nl/request"
 xmlns:xs="http://www.w3.org/2001/XMLSchema"
 targetNamespace="http://whitehorses.nl/request"
 elementFormDefault="qualified"
 attributeFormDefault="unqualified">
 <xs:element name="request">
  <xs:complexType>
   <xs:sequence>
    <xs:element name="runid" type="xs:short"/>
    <xs:element name="message" type="xs:string" minOccurs="0"/>
   </xs:sequence>
  </xs:complexType>
 </xs:element>
</xs:schema>
And the response xsd
<?xml version="1.0" encoding="UTF-8"?>
<xs:schema xmlns="http://whitehorses.nl/response"
 xmlns:xs="http://www.w3.org/2001/XMLSchema"
 targetNamespace="http://whitehorses.nl/response"
 elementFormDefault="qualified"
 attributeFormDefault="unqualified">
 <xs:element name="response">
  <xs:complexType>
   <xs:sequence>
    <xs:element name="runid" type="xs:short"/>
    <xs:element name="message" type="xs:string" minOccurs="0"/>
    <xs:element name="errorid" type="xs:string" minOccurs="0"/>
    <xs:element name="error" type="xs:anyType" minOccurs="0"/>
   </xs:sequence>
  </xs:complexType>
 </xs:element>
</xs:schema>
When everything goes well I will only return the runid element else we get the full message with the errorcode. With these xsd's I made a simple WSDL which I can use in the proxy service.

First part of this blog entry is to make the happy flow when this works we can add the xsd validation.
Make a new proxy service and use this WSDL.


The next step is to make a simple business service with file transport

In my case I put the request xml in the c drive temp folder.

Go back to your proxy service where we create a new message flow.
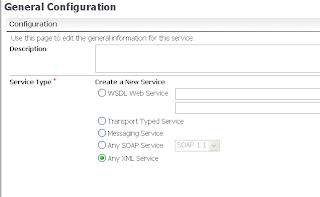
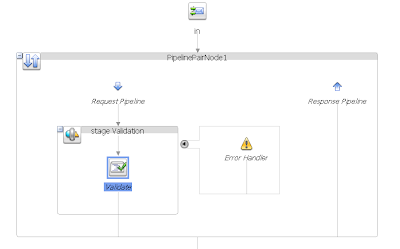
Add a route-node to the flow with inside a new routing. This routing will call the file business service

Add an assign component to request action flow so I can retrieve the runid from the request and add this to the runid variable. This variable I can use for the response.
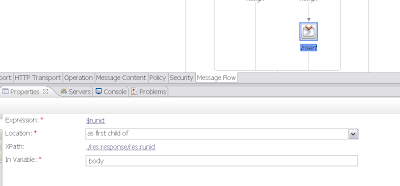
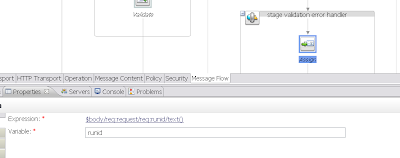
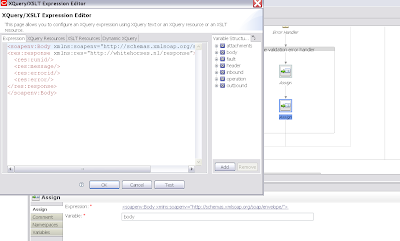
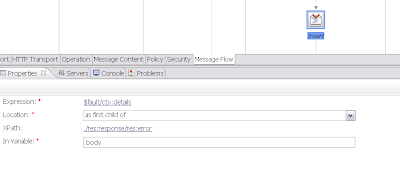
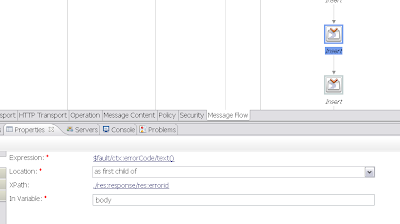
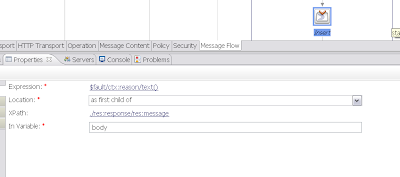
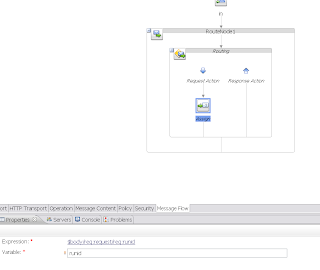
                              To make a return message I add an assign to the response action. Now I add the response template xml to the body variable


Add an insert to the response action after the assign. In this insert we will add the runid of the request to the runid of the response message.
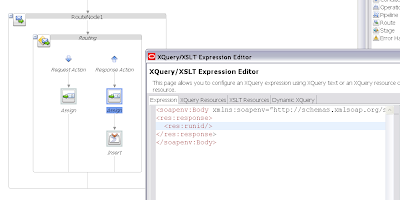
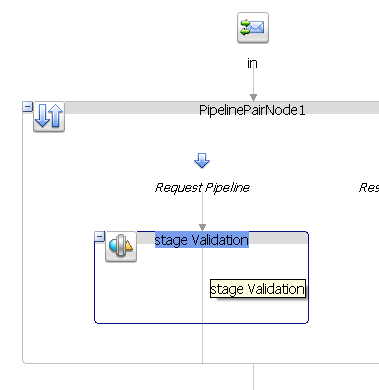
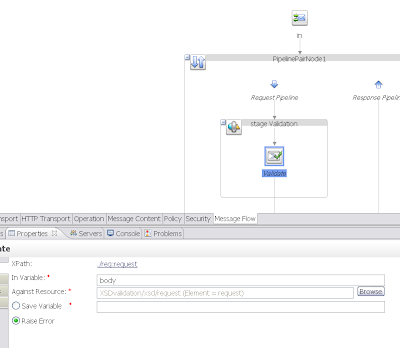
The first part is finished, you service should work now. In the second part we will add the XSD validation.
To make a custom exception handling for the xsd we need to add a Pipeline Pair node.

In the request pipeline I will add a new stage

In this stage I use the validation component. Now we have to select an element in the body variable which OSB will validate against the XSD. Provide the XSD and use the raise error option.

Add an error handler to this stage

First we add an assign to the stage to retrieve the runid of the request message so I can use this for the response.

Add a second assign to the stage. In this assign I will add the response template xml to the body variable

Add the runid to the response xml

Add the error details to the response xml

And the error code

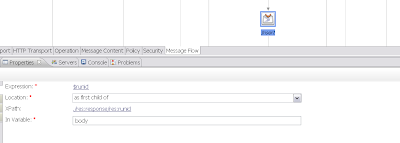
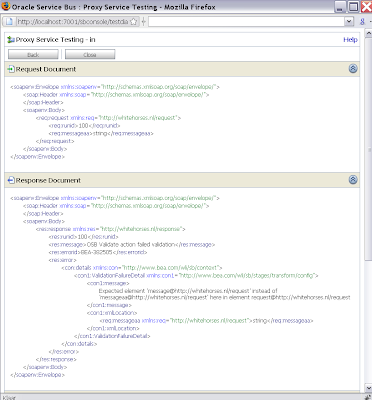
With the reply we can give back the response xml back to the client. Very important report no error because this is a handled exception

The second part is also finished, we only have to test this proxy service by adding a unknow element to the request and look at the response. Here is a picture of the result.

Tuesday, December 28, 2010

AIA Error Notifications

In a typical SOA deployment, there are a number of services deployed and thousands of messages exchanged on any given day. Howsoever we design our services and optimize the service deployment infrastructure, exceptions do happen. These exceptions can be broadly categorized as System Faults and Business Faults.
AIA Error Handling Framework captures all the exceptions in a consistent manner and provides notification capability out of the box to notify appropriate people about the exception. This enables them to analyze the exception and take appropriate corrective action.
AIA Email notifications can be configured in as little as 15 minutes following these 4 steps;

1. Define appropriate Users and Roles
For a given exception, the service SLA may require you to notify different users. You may need to notify different people for system errors, network issues etc. and different people for business errors such as data validation or CreditCheckFailed etc. AIA provides an XML based user repository (JAZN), but you could also configure your existing user store such as LDAP to define various roles of system users, integration admin, participating application admin etc.
If you are using JAZN,
  • Update “$SOA_HOME/j2ee/oc4j_soa/config/system-jazn-data.xml” file to define roles and users. AIA defines default AIAIntegrationAdmin role and AIAIntegrationAdminUser out of the box.
  • Update “$SOA_HOME/bpel/system/services/config/user-properties.xml” file to populate various attributes for these roles and users. Ensure to provide a valid email address for your domain.
2. Associate Roles to a specific Exceptions
AIA provides ability to notify different roles based on process name, service name, system id and error code. You can setup these notifications on AIA Console -> Setup -> Error Notification screen. For more information, see Oracle Application Integration Architecture Core Infrastructure Components Guide, "Setting Up Error Notifications for Oracle AIA Processes". It also explains the logic used to determine notification roles for an error.
If no appropriate role is defined for a certain error, AIA notify the default role (AIAIntegrationAdmin) defined in AIAConfigurationProperties.xml file.
3. Configure Email channel
Update “$SOA_HOME/bpel/system/services/config/ns_emails.xml” file;
  • In the <EmailAccounts> element, set the “NotificationMode” attribute to “EMAIL”, instead of “NONE”.
  • In the <GeneralSettings> section, set the <FromAddress> to a valid email address for your domain.
  • In the <OutgoingServerSettings> section, set the correct <STMPHost> and <STMPPort> for your domain.
  • Comment out <IncomingServerSettings> section if you do not have a need for it.
4. Restart BPEL Process Manager
Now you should see email notifications triggered for every error in the AIA system.
Oracle SOA Suite 10g supports five channels of notifications, Email, Pager, Fax, SMS and Voice. AIA provides an implementation for Email notifications, but it is easy to configure any other channel and provide custom notifications if needed.

MDS repository for ADF 11G

With Fusion Middleware 11G the MDS repository plays a important role for ADF customizations and SOA shared objects. In this blog I explain how you can create a MDS database repository, deploy customizations to this MDS database and what you can do with MDS in the Enterprise manager website.

First we need to download the RCU repository creation utility and install a MDS repository in a Oracle Database.


Use a sysdba account
 
 We only have to select the Metadata Services and provide a prefix


Next we need to install Weblogic with the Soa, Webcenter or Application development runtime extension. This extension gives us the Enterprise Manager website where we can configure the MDS repository. Select your Weblogic domain and select the MDS menu option
 

Register the just created MDS repository. In my case I will call this repository adf


The EM website automatically create a datasource which we can use later.


If we have an ADF application with customizations and we deploy this to the Weblogic Server then JDeveloper detects the MDS repository


JDeveloper automatically creates a new MDS partition and uses your ear deployment name as partition name. It also uses the just created datasource to fill the MDS database. Just press deploy

When we go back to the EM website we can see the just created MDS partition.


The EM website also provides MBeans with some MDS operations.


For example we can query the partitions of a MDS repository


When we select our just deployed ADF application and go to the MDS menu option, we can administer the MDS partition of this application.


We can export the MDS customization and import this to a different Weblogic server which has the same ADF application.


At last we can take a look at the MDS repository, here we can see that all the customizations entries are registered in the database. But the customizations xml are still located on the server, a bit strange I would suspect that with a MDS repository in the database that everything is loaded in the database

HTTP binding in Soa Suite 11g PS2

With Patch Set 2 of Soa Suite 11g Oracle added the HTTP Binding to the supported Adapters. This Adapter was already a feature of Soa Suite 10g, so it is great news that is back. So when your HTTP Service returns a XML message then you can use this binding in your composite application. When the HTTP Service has a  JSON response then you can use the Spring Context Component ( With PS2 Spring Context is supported ). Lucas made a great example how you can achieve this.

In this blogpost I will show how you can use this HTTP Binding as a Service or as a Reference Adapter. I start with a Service so I can use this Service later in the Reference Adapter.
Drag the HTTP Binding from the Component Palette to the Service part of the Composite. Use Service as Type and when you want to have this Service, to return a message then you should select Request-Response as Operation Type.


Provide the Request and Response XSD and choose the right element. For the Request Message Schema you can also use the wizard.


Next step is to wire this Service to a component. Choose a BPEL component and use the Define Service Later template.

Make a wire between the Service and the BPEL component.


Open the BPEL component and a Receive and Reply Activity and finish your BPEL. When everything is valid then you can deploy this to the Soa Suite Server.

For this HTTP Binding Service Soa Suite adds two Port types to the WSDL. This means you can also invoke this Service with a SOAP message

<wsdl:service name="execute">
        <wsdl:port name="Request_Response_pt" binding="tns:Request_Response_ptHttpGET">
            <http:address xmlns:http="http://schemas.xmlsoap.org/wsdl/http/"  location="http://laptopedwin.wh.lan:8001/soa-infra/services/default/HttpBinding/execute%22/>
        </wsdl:port>
        <wsdl:port name="Request_Response_pt_soappt"
binding="tns:Request_Response_pttBinding">
            <soap:address xmlns:soap="http://schemas.xmlsoap.org/wsdl/soap/"
location="http://laptopedwin.wh.lan:8001/soa-infra/services/default/HttpBinding/execute%22/>
        </wsdl:port>
    </wsdl:service>

The Best way to test this HTTP Service is to open the endpoint url in a browser
http://laptopedwin.wh.lan:8001/soa-infra/services/default/HttpBinding/execute
This one is better then the tester of the Enterprise manager

Here you can choose for the normal Invoke ( Soap message ) or use REST POST or GET

 Or you can use the HTTP analyzer of JDeveloper, this is a great way to see the raw request and response

The HTTP binding can also be used as a Reference adapter. For example you can use the just created Service as Endpoint. Provide the Request and Response Schema's.


To test this Reference Adapter you can add a Mediator component with the same Request and Response Schema's. Expose this Mediator as a Service and wire the Reference Adapter to the Mediator and complete the routing rule.

Deploy this composite application, invoke the Mediator Service and take a look at the instances in the Enterprise Manager